We have an inefficient fireplace in our living room (which is also my home office) so I’ve been dreaming about good heating and warm toes. When Jo posted this rustic DIY outdoor fireplace in the Junk Map Facebook Group it caught my eye immediately.
Could we do something like this at our place? Unfortunately not easily. Not in the house anyway. There are strict regulations around interior heating in Australia including certified appliances and installation and emission rules. (Check local council and EPA guidelines.)
But it’s a fun upcycle from an antique safe!
Jo Caminiti lives in regional Victoria, uses the heater in an outdoor workshop, and did plenty of research into safety and emissions. The result is a sturdy, practical heater that warms her work space beautifully. Here’s how she did it.

By Jo Caminiti
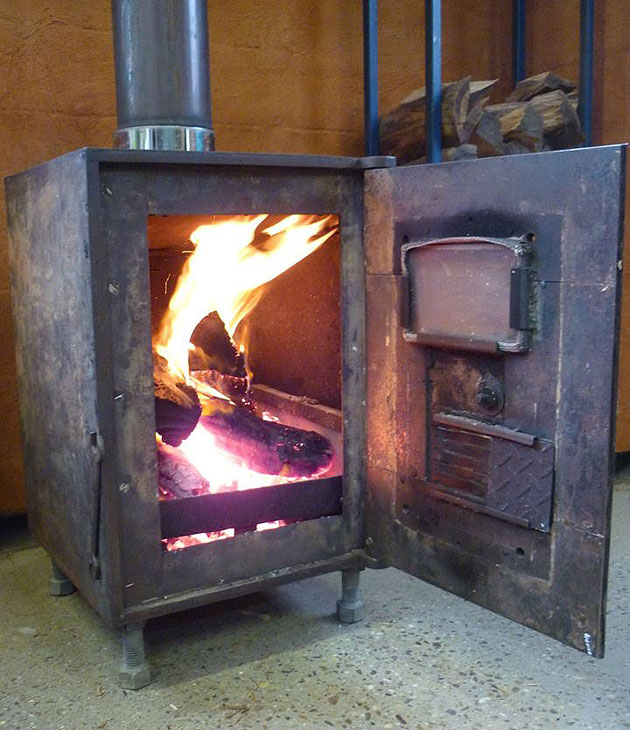
From the moment I saw the episode of Kevin McLeod’s ‘Man Made Home’ TV series where he and his engineering mate convert an antique safe into a fireplace for his shed, my old unused safe was destined for a new life.
My ‘safe’ fireplace attracts a lot of attention because it combines function, aesthetics and thrift in one quirky upcycled package.
I didn’t knock it up in a weekend like Kevin did. The DIY process was slow, it took a lot of research, sourcing of materials, and effort. And I broke and blunted a lot of drill bits due to my impatience.
An antique safe makes a good firebox because it is made of heavy steel plate which radiates heat. First you need to gut it, by stripping out the inner liner and safely removing any filling (see safety notes below). That took considerable effort which still makes me laugh when I watch movies where they so easily break into safes.
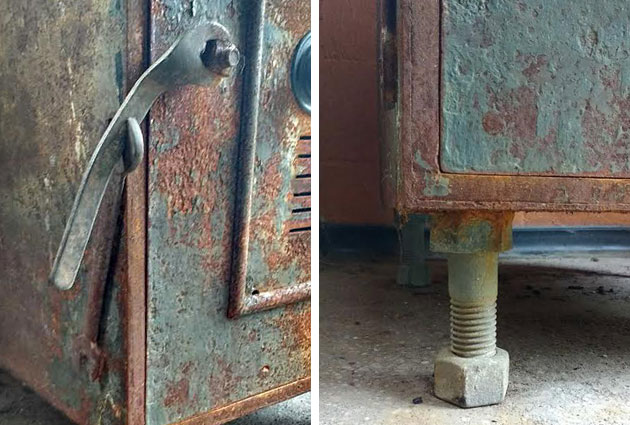
For my safe, the door locking mechanism was within the door liner, so I had to make a new catch. I borrowed an idea from a door latch I made out of spanners on another project. I cut off the head of a bolt and welded the threaded end onto the door. A spanner was then welded onto a nut which fits the bolt. Another spanner was welded onto the side of the safe with part of the head protruding to act as a catch for the spanner handle on the door.
To ensure that smoke would not come out of the firebox when the door was opened, I researched what flue diameter was required for the door size. I had to cut a six inch circle in the top of the safe – angle grinder discs are cheaper than drill bits! I sourced the six inch flue from a recycle yard, and found a stainless steel dairy pipe fitting at another yard to make the flue collar to weld onto the safe.
The angled baffle in the top of the fire box rests on nuts welded to the walls and prevents flames from heading up the flue. The bottom of the fire box has a red brick base and a row of fire bricks around the sides held in by a U shaped angle iron that sits on top of them. The bricks protect the steel from direct contact with the coals and act as a heat sink. You can cook single pizzas on the brick floor or grill over the coals.


A window and slots for the primary air vent were cut into the door using an angle grinder. I made the window to fit a small glass offcut from the local wood heater shop where I bought fire bricks and fittings to get the flue through the roof. The air vent can be adjusted with a plate that slides on rails welded to the inside of the door. The vent handle is a small spanner, twisted with one head cut off and spot welded onto the plate (that was fiddly!)
To reduce emissions and get more complete burning, preheated secondary air is provided at the back of the firebox just below the baffle. A large plate with the tops and sides covered was welded onto the back of the safe to allow air to draw up from the bottom, heating on the way to small holes drilled in the back of the firebox.
Raiding my stash of clearing sale treasures, I made adjustable legs by welding the heads of large bolts onto the bottom of the heater with the nuts as feet.

We installed the heater in our workshop using a double skinned flue fitting through the tin roof on advice from our local wood heater shop. It is quick to heat up and provide an island of warmth. Over time, the polished concrete floor and rendered block wall behind absorb the heat and help keep the workshop toasty even with the roller doors open.
Now, if I can get my hands on a small jet engine cowling I can get onto making a hot tub…
Safes are very heavy and tough. They are often filled with mysterious substances between the inner and outer shells to make them heavy, heat resistant, and to foul attempts at breaking in. Mine was filled with fly ash, but it could have been asbestos, or even something combustible. Please use protective equipment and dispose of materials appropriately.
Safes are generally old and painted, probably with layers of lead based paint. Once I had stripped out the inner shell and removed the fly ash, I took the outer shell outside, lit a small fire in it and scraped off the paint as it bubbled while wearing a suitable mask. (Paint stripper might be a better option in urban areas.)
Poorly designed wood heaters can produce a lot of smoke which is a nuisance and a health hazard to both you and the neighbours. I researched the design to ensure efficient operation and reduce pollution.
Building regulations for installing combustion heaters in dwellings are strict for good reason. Do not self install a DIY heater in a house without a building permit. You would be breaking the law and voiding your insurance. My heater is currently in a concrete block workshop detached from the house and it would also be suitable for an outdoor entertaining area.
Jo Caminiti is an artist, maker and grower in Gippsland, Victoria.
You can follow more of Jo’s creative projects on Facebook or Instagram.
Note: All images by Jo Caminiti, reproduced with permission.